
To provision a virtual database (VDB), you can either use an existing dSource snapshot or use another VDB snapshot for VDB to VDB provisioning. A snapshot is a specific point in time on the timeflow.
To ensure successful provisioning of a Virtual Database (VDB), at least one of the following conditions must be satisfied. These conditions apply when provisioning a VDB from a dSource as well as when creating a child VDB from a parent VDB. In this context:
resource-1 refers to the dSource or parent VDB.
resource-2 refers to the VDB being provisioned.
-
Resource-1 must be shut down during provisioning
Resource-1 must be in a shutdown state at the time of provisioning.
For dSources, this is typically the default state after a snapshot or resynchronization operation, as all processes are stopped during these actions.
-
Separate certificate files for Resource-1 and Resource-2
Resource-1 and resource-2 must use distinct certificate files.
Ensure that:
-
The certificate for resource-2 does not include the IP address of resource-1.
-
Similarly, the certificate for resource-1 does not include the IP address of resource-2.
-
Prerequisites
-
Must have linked a dSource from a staging instance following the instructions in "Linking a CockroachDB dSource," or have already created a VDB from which you intend to provision another VDB.
-
A CockroachDB target environment must be set-up with the necessary requirements as described in CockroachDB support and requirements.
-
A CockroachDB binary with the same version as the source database must be installed on the Target.
The VDBs started on public IP must have 127.0.0.1 added to the certificates present on the primary target host. That is, while running cockroach
cert list --certs-dir=<path-to-certs>, the IP 127.0.0.1 should show up.In case of a multi-host VDB, make sure that the ports following the CRDB port and console port provided for primary host are available on the primary host. That is, for a 3-node multihost VDB with CRDB port 26257 and console port 8080
The ports 26257, 26258, 26259 should be available on the primary host.
The ports 8080, 8081, 8082 should be available on primary host.
Procedure
-
Navigate to Manage, and select Datasets.
-
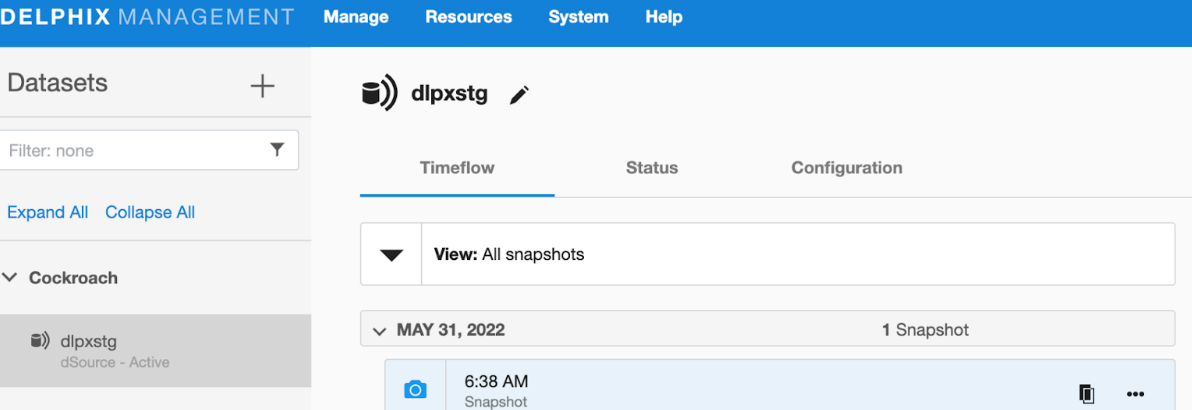
Select the dataset and the snapshot that you want provision from. Click the provision VDB icon to open the provision VDB wizard.
-
Select a target environment from the left pane, and an Installation to use from the dropdown list of available CockroachDB instances on that environment.
-
Set the Environment User to be the Instance Owner.
You can only select instance owners if you have multiple environment users set on that host.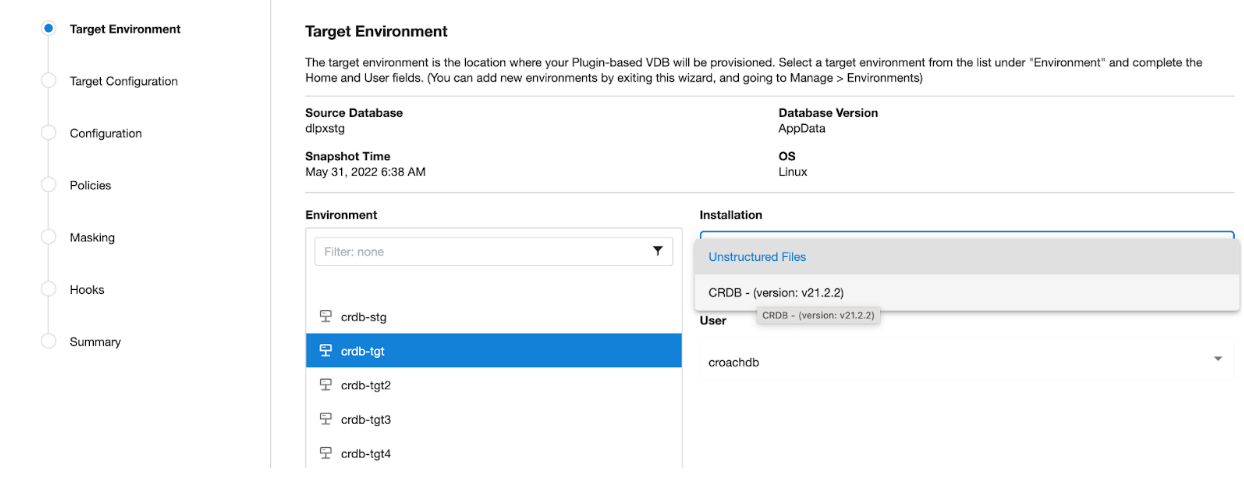
-
Next, You will see the Target Configuration section where you need to enter VDB specific parameters.
-
Mount Path Mount Path for VDB CockroachDB Cluster datafiles
-
IP Address / Hostname of the Primary Target Host IP Address / Hostname of the interface for Primary Target Host
-
Target CockroachDB Port Number Target DB port for cluster’s inter-node communication
-
Target CockroachDB Console Port Number Target Console port for HTTP requests
-
CockroachDB VDB Cluster Name VDB Cluster Name to be configured on Target Host
-
Secure Mode Option to run the CockroachDB server in secure mode
-
Certificate directory path The absolute path to the certificate directory, it must have valid certificates containing the IP address or hostname for the CockroachDB server
-
CockroachDB Parameters Additional CockroachDB configuration parameters to start the CockroachDB cluster
-
Parameter Name CockroachDB Cluster configuration parameter name
-
Parameter Value CockroachDB Cluster configuration parameter value
-
-
On the configuration page, select the Additional Nodes (+Add) button for adding new nodes to CockroachDB target cluster.
-
Environment Select the target environment from drop-down to add the new CockroachDB node to cluster.
-
Environment User Select the target environment user to add the new CockroachDB node to cluster.
-
IP Address / Hostname of the Additional Node Target Host IP Address / Hostname of the interface for Secondary Target Host.
-
Target CockroachDB Port Number Target DB port for cluster’s inter-node communication.
-
Target CockroachDB Console Port Number Target Console port for HTTP requests.
-
Certificate directory path The absolute path to the certificate directory, it must have valid certificates containing the IP address or hostname for the CockroachDB server.
-
Append CRDB Parameters Option to append the existing primary node CRDB parameters to additional node.
-
-
Next, select Additional Node CRDB Parameters to overwrite additional node CockroachDB parameters configured in Target CockroachDB cluster. Click on (+Add) button to add CRDB parameters.
-
Parameter Name CockroachDB Cluster configuration parameter name.
-
Parameter Value CockroachDB Cluster configuration parameter value.
-
-
Then click Next to proceed further.
-
-
On the Configuration page, Select the VDB Name and Target Group for the VDB.
-
Add a new group, if required.
-
Select a Snapshot Policy for the VDB.
-
Click Next.
10. Specify any desired hook operations.
11. Click Next.
12. Review the Provisioning Configuration and Data Management information.
13. Click Submit.
When provisioning starts, you can review the progress of the job in the Databases panel, or in the Job History panel of the Dashboard.
When the provisioning completes a new VDB timeflow will be created. Once the VDB is created successfully, you can review the datasets on the Manage > Datasets screen in the left hand panel. You have now provisioned a CockroachDB VDB. Moreover, the VDB will be included in the group you designated and listed in the Databases panel. If you select the VDB in the Databases panel and click the Open icon, you can view its card, which contains information about the database and its Data Management settings.