
Action required: The Continuous Data UI, API, and CLI are scheduled for end of life. Review the latest migration guidance and start planning your transition to Data Control Tower.
On new engine installations of 2026.5.0.0 and later, the Admin UI opens directly to the Performance Dashboard, and the Manage, Resources, and System menus are unavailable. Engines upgraded from an earlier version keep full Admin UI access. This restriction cannot be changed by customers; contact Delphix Support if you need it lifted temporarily.
Learn more about the Continuous Data end-of-life announcement.
Prerequisites
To set up an IBM Db2 staging environment, ensure all the essential requirements as described in Requirements and Prerequisites are met.
In addition, we recommend verifying environment and host compatibility with Delphix Continuous Data using the Host Checker tool. You can learn more about this in the Host Checker section.
Procedure
Perform the following steps to add an environment to the Delphix Continuous Data Engine:
Login to the Delphix Management application.
Navigate to the Manage > Environments page.
Click the Actions menu and select Add Environment.
From the Add Environment dialog window, select Unix/Linux.
Select Standalone Host.
Click Next.
Provide the name of the environment.
Provide the Host IP address or host FQDN.
Provide the SSH port. The default value is 22.
Choose the Login Type that fits your setup.
Username and Password – provide the OS username and password.
Username and Engine Public Key – provide the OS username.
Username and Custom Key Pair - provide the OS username.
Password Vault – select from an existing Enterprise Password Vault.
Based on your Login Type, authenticate the environment by following the directions below:
For Login Type ‘Username and Password’, enter the password associated with the user in step 11.
For Login Type ‘Username and Engine Public Key’,
Enter the OS username.
Click View Public Key.
Copy the public key that is displayed, and append it to the end of your
~/.ssh/authorized_keysfile. If this file does not exist, it must be created. Note: If you want to use public-key authentication for logging into your Unix-based environment, you have two options:Use the Delphix Continuous Data Engine's key pair. For more information on how to use the Delphix Continuous Data Engine's key pair, refer to theHow to use the Continuous Data Engine’s key-pairsection.
Provide a key pair for this environment. As an alternative, a key pair specific for this environment can be provided via the API or CLI. For instructions, refer to CLI Cookbook: Setting up SSH key authentication for UNIX environment users.
For Login Type ‘Username and Custom Key Pair’:
Enter the OS username.
Provide Private Key for the environment.
Provide Public Key for the environment.
The addition of the public key is a one-time requirement per user and per environment. Additionally, you have the option to add public key authentication to an environment user's profile via CLI (for details, refer to the CLI Cookbook: Setting up SSH key authentication for UNIX environment users topic).
If you intend to use a low-privileged OS user, ensure that you have fulfilled the Prerequisites for Privilege Elevation using DLPX_DB_EXEC Script.
Enter Toolkit Path (ensure that the toolkit path does not have any spaces).
Click on Validate to verify the user Credentials.
To provide your own Oracle Java Development Kit, select the Provide my own JDK checkbox and click Next.
On the Java Development Kit page, provide an absolute path to your Oracle JDK and click Next.
Review the environment configuration Summary and click Submit.
After successfully adding and discovering the environment, you should be able to view the newly added environment listed under the Environments tab. In case it does not appear, click the refresh icon in your browser.
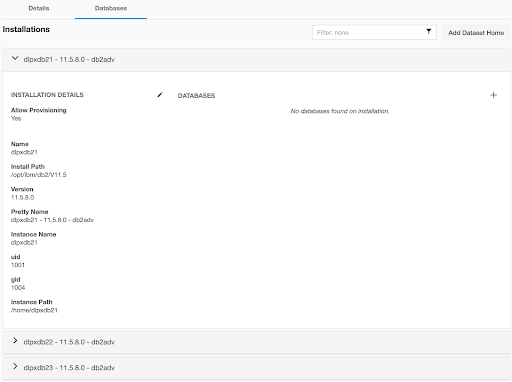
After the environment has been successfully added to the Delphix Continuous Data Engine, you should be able to see all the discovered repositories under the Databases tab.
Perform the following steps to access the information about any environment you have created:
Navigate to Manage > Environments.
Select the environment name.