
Delphix creates a staging database using user provided source backup from a backup staging directory.
In order to ensure that the staging database remains in-sync with the source database, User can provide additional differential backups from the source database to the staging database.
Prerequisites
-
Staging environment must be added to Delphix.
-
A Source Config must be created on the staging environment-MSSQL Linux repository.
-
A MSSQL Linux with the same version as the source database must be installed in the Staging environment.
Creating dSource
-
Login to Delphix Management application.
-
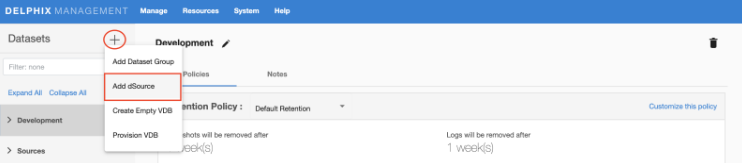
Click Manage > Datasets.
-
Select Add dSource.
-
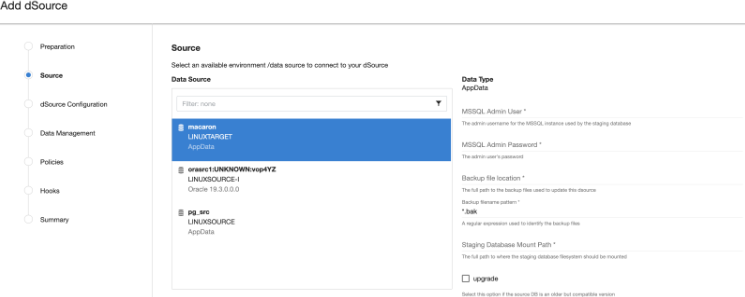
In the Add dSource wizard, select the MSSQL source configuration which is created on the staging host.
-
Provide all required details for dsource creation
-
MSSQL user
-
MSSQL Staging user with sysadmin role.
-
MSSQL user password
-
Password of the provided user.
-
Backup file location
-
Path to backup files used to update the dsource located on staging host.
-
Backup filename pattern
-
Pattern used to identify backup files (eg. *.bak).
-
Staging Database Mount Path (on Staging Host)
This is the mount directory for Delphix on the staging host. This location should be unique and empty. -
Upgrade: Use this option if the source database is an older but compatible version.
-
-
On dSource Configuration screen, select the dataset group where the dSource will be placed and click Next.
-
On the Data Management screen, select the staging environment and the environment user and click Next.
-
On the Policies screen, select the Snapsync and Retention policies for the dSource and click Next.
-
On the Hooks screen, add any pre-sync and (or) post-sync hooks as required and click Next.
-
Review the dSource configuration on the Summary screen and submit. The Linking process begins.
Once the dSource creation is successful, the Timeflow tab should show the initial snapshot.